Whether you’ve practiced yoga once or you’re a seasoned professional, you’ll likely have heard of downward dog. This fundamental pose transcends through almost every style of yoga (with the exception of Yoga Nidra, perhaps), and it forms the beginning, middle, and end of many important routines.
Downward dog (or Adho Mukha Svanasana) is many things, and it’s with good reason that this pose is so common. It’s a pose that builds strength and stability; it’s a pose that improves flexibility; and at the same time, it’s a place of rest during a yoga practice.
Without this pose, the world of yoga would look quite different. Here’s our comprehensive guide to downward dog.
First things first: Is downward dog a resting pose?
For many, downward dog is an active pose that requires a lot of work, and the idea of ‘resting’ in this position isn’t a comfortable thing to do. You might find that this pose causes some wrist pain, and it may make your lower back feel a little weaker than usual. What’s more, it can highlight tightness in your hamstrings and calves.
If you feel this way, you’re not alone. Battling ‘the dog’ is a common gripe among many yogis, especially beginners. But, while challenging at first, downward dog offers a reward unlike any other pose, and after some practice, this pose will quickly become your place of rest. The key? Keep practicing.
On the topic of practice, it’s critical that you practice safely. If you have an injury in one or both of your wrists, or if your wrists just keep hurting, there are ways to decrease the impact put on them. Here are a few suggestions:
- Practice downward dog with your hands on yoga blocks. This will make the extension of the wrists smaller.
- Fold or roll the front of your mat a couple of times and practice downward dog with the heels of your palms elevated on the folded section. This will also decrease the extension of the wrists.
- Practice lower arm downward dog. To do this, place your lower arms on the floor so they are parallel to each other. This variation is also called the dolphin. This will take the stress completely out of the wrists, but, it can be harder for the shoulders.
As ever, if you’re in persistent pain in your wrists (or elsewhere in your body) and you’re unsure why, consult your doctor.
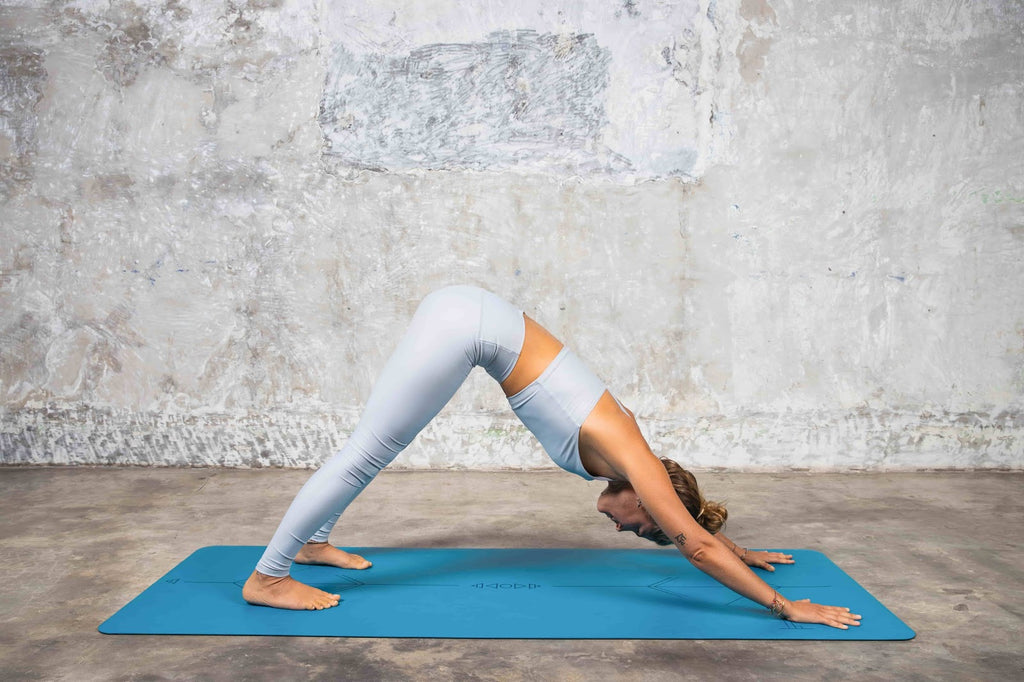
Downward dog: the importance of correct hand and foot placement
Good downward dog is the result of smart hand and foot placement on your mat. Ultimately, when your hands and feet are too far apart, downward dog can cause pain, and it becomes a lot harder than it ought to be. On the contrary, when your hands and feet are too close, downward dog becomes a little too easy and you won’t reap the rewards.
Much like goldilocks, then, the goal is to place your hands and feet on the mat in a ‘just right’ position. If you’re practicing yoga without the guidance of a seasoned expert (ie you’re stuck at home and practicing on the kitchen floor), it might be worth investing in a yoga mat with alignment guides that are tailored to your body. That way, you can find the best placement for your hands and feet every time you come to practice.
To help you find the best position for your hands and feet in downward dog, follow these simple steps:
- Get into a plank position with your arms and elbows fully extended (keep your core engaged).
- In this position, look down at the centre of your wrists. Make sure they are placed directly below your shoulders. Once checked, begin to inch your feet forward enough so you are resting on the balls of the feet.
- Now, slowly lift your hips to the sky, tuck your chin, and keep your legs extended as you work back from the balls of your feet to your heels.
Which muscle groups does downward-facing dog work?
One reason downward dog is so commonplace in the yoga community is that it works multiple muscle groups in a variety of ways, all at once. Like deadlifts, squats, and bench press in bodybuilding, downward dog is a foundation-building pose that engages cross-functional muscle groups.
Here are the muscles that are actively and passively engaged when in downward dog, and those muscles that reap the benefits of a good stretch.
Active muscles
From head to toe, downward dog engages many muscle groups. Through the arms, your triceps and biceps are actively engaged during all phases of the pose – whether that’s coming into downward dog, holding the position, or exiting the pose.
Across your torso, downward dog engages those critical core muscles, including your abdomen, your serratus anterior muscle (a muscle that originates on the surface of the 1st to 8th ribs at the side of the chest), your infraspinatus muscle (one of four muscles that supports your rotator cuff), and your trapezius (or ‘traps’ for short).
Across the lower body, downward dog engages your hip flexors, as well as your tibialis anterior (a muscle that runs down the side and front of your shin bone), and most of the muscles in the front of your thighs, including the rectus femoris and the vastus lateralis.
Passive muscles
Other key muscles act as stabilizers that support your joints and active muscle groups while in downward dog. Your deltoids and brachioradialis (a muscle of the forearm that flexes the forearm at the elbow) reap the rewards of strength and stretch, along with muscles including your pectorals in the chest and your ankle dorsiflexors (the muscles that engage when you bring your toes up to your shin).
Stretched muscles
Many of the muscle groups in your back and lower body stretch when in downward dog, including your lats (or latissimus dorsi), your glutes (or gluteus maximus), your hamstrings (including your semitendinosus muscle), and your calves (including your gastrocnemius, soleus and your flexor hallucis longus muscles).
The mind-body benefits of downward dog
There are copious rewards that come with performing a daily downward dog, not only physically but mentally, too. Here are just a few benefits:
- It’ll limber you up: Yoga in general — and all forms of movement, for that matter — can stimulate the various organ systems in your body. But downward dog has a special advantage. Because your heart is above your head, this pose encourages healthy blood flow, which works to calm you down and give you energy.
- It’ll clear your head: Again, much like all of yoga, downward-facing dog can help open up your sinuses and clear the flow of mucus if you suffer from any nasal congestion. Oh, it’ll also clear your mind, too.
- It fights slumpy-posture syndrome: Most of us working from home are moving very little these days. Luckily, downward dog acts as an antidote to all that time we spend hunched over. Practice often and you might be able to relieve neck and back pain associated with poor posture (and even find yourself sitting up a little straighter, too).
- It gives you fast feet: According to many, downward dog is a great pose to improve your footwork because it engages and strengthens many of the smaller muscles around your calves and ankles.
- It’ll make you look younger: Okay, hear us out on this one, but according to Rebecca Tung, MD, a dermatologist at Loyola University Medical Center in Chicago, “The added blood flow to your face and brain, combined with the requisite focus on your practice, adds a boost in terms of a youthful dewy afterglow and calmer overall expression.” So if you want to look (and feel) younger, perform a daily downward dog.
Tips for mastering downward dog safely
Here are 10 tips for mastering downward-facing dog safely.
- Keep your hands shoulder-distance apart: Ground your weight through your fingers by spreading them wide and align your wrist crease to the front of the mat.
- Keep your feet hip-distance apart: When you get into downward dog, be sure to glance back and check your feet. If you can see your heels, try turning them out slightly so you can’t see them anymore.
- Remember to activate your arms: Press down through your wrists and feel the energy draw back up to activate your arms. Feel as though your thumbs want to draw in magnetically towards each other, which will slightly rotate your forearms inwards, towards each other.
- Externally rotate your upper arms: This subtle action will help keep your shoulders away from your ears and promote more space through the neck.
- Remember that your neck and head continue along the same line as the spine: Your neck is part of your spine. Be sure to treat your neck, head, and spine as one cohesive group..
- Firm your shoulder blades: Try to avoid scrunching up through the tops of your shoulders and around the neck. This can create more tension.
- Engage the lower belly: A firm core is key to downward dog. It’ll also help take the pressure off your shoulders and wrists.
- Keep a slight bend in your knees: Don’t fully extend your legs and keep a slight bounce in your pose.
- Pedal for more movement: To activate downward dog further, try slowly pedaling each heel down towards the floor and individually stretch the backs of each leg.
- Press all your fingers into the mat: This will relieve pressure on the wrists, bring added stability into the forearms and give a greater stretch to the shoulders.
Looking for more on downward dog?
We recently wrote a guide outlining the five key steps you need to take to get into a perfect downward dog. Be sure to read it here.
Leave a Reply